WhenDid.io's numeric field feature allows Premium users to track numeric values alongside their button clicks. Instead of just recording when something happened, you can also capture how much, how many, or what rating to attach to each click. This transforms your action buttons into powerful data collection tools.
Numeric fields are essential for advanced features like custom counters and provide the foundation for quantitative tracking in WhenDid.io.
How to Set Up a Numeric Field
To enable and configure a numeric field for an action button:
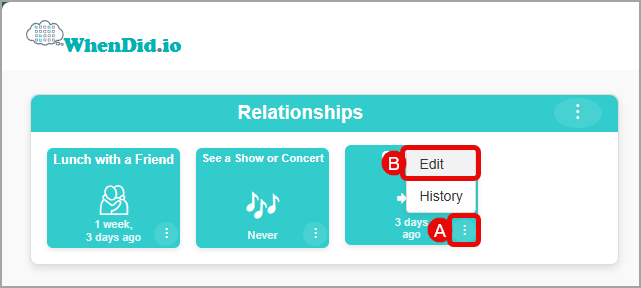
- Click the menu icon (three dots) in the bottom right corner of the action button.
- Select Edit from the menu. The Edit Action Button window will open.
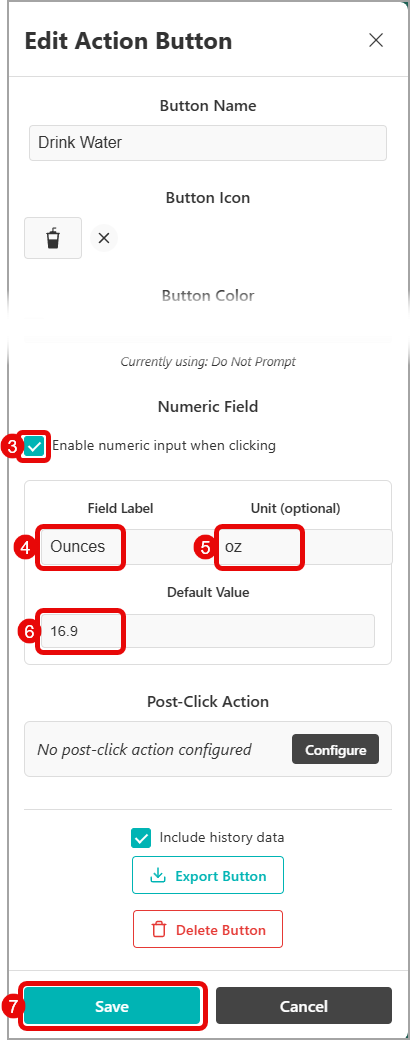
- Scroll down to the Numeric Field section. Check the Enable numeric input when clicking checkbox.
- Set the Field Label: Enter a descriptive name (e.g., "Price", "Rating", "Calories")
- Set the Unit: Add an optional unit symbol or abbreviation (e.g., "$", "pts", "oz") (optional)
- Default Value: Set a number that will be pre-filled in the input field
- Click Save to apply your numeric field configuration.
What is a Numeric Field?
A numeric field adds a number input prompt to your action button clicks. When enabled, clicking the button will display a form where you can enter a numeric value along with optional notes before saving the click event.
Key benefits of numeric fields:
- Quantitative tracking: Record measurable values with each click
- Flexible data types: Track decimals, whole numbers, positive or negative values
- Custom labels and units: Configure meaningful descriptions for your data
- Default values: Set common values to speed up data entry
- Advanced analytics: Enable features like custom counters and aggregated statistics
Numeric Field Components
When you configure a numeric field, you can customize three key components:
Field Label
The descriptive name that appears above the input field when you click the button. This helps you remember what kind of value you're tracking.
Examples:
- "Price" for expense tracking
- "Rating" for experience evaluation
- "Duration" for time-based activities
- "Calories" for nutrition tracking
Unit (Optional)
A short suffix that appears after the input field to indicate what type of measurement you're recording.
Examples:
- "$" for currency
- "pts" for points or ratings
- "oz" for fluid ounces
- "min" for minutes
- "lbs" for weight
Default Value
A pre-filled number that appears in the input field to speed up data entry for common values. You can still change this value for each individual click.
Examples:
- "1" for simple counting
- "0" for starting from zero
- "5" for middle-range ratings (1-10 scale)
- "10.00" for common price points
How Numeric Fields Work
When you click an action button with a numeric field enabled:
- Click the button: The button registers your click
- Input form appears: A prompt displays with your configured field label and unit
- Enter value: Type the numeric value (the default value will be pre-filled)
- Add notes (optional): Include additional context if click notes are enabled
- Save: The click is recorded with both the timestamp and numeric value
The numeric data is stored with each click and can be used for custom counters, exported with your data, and viewed in your button's history.
Prerequisites
To use numeric fields, you need:
- Premium subscription: Numeric tracking is a Premium feature
- Signed-in account: You must be signed in to configure and use numeric fields
- Action button: An existing button to configure
Using Your Numeric Field
Once configured, clicking your action button will:
- Display a popup with your numeric field
- Show the field label and unit you configured
- Pre-fill the default value (which you can change)
- Allow you to add optional notes if click notes are enabled
- Save both the timestamp and numeric value when you submit
The numeric data becomes part of your button's history and can be viewed, edited, and exported along with your other tracking data.
Common Use Cases
Expense Tracking
- Label: "Amount"
- Unit: "$"
- Default: "0.00"
- Use: Track spending with each purchase
Fitness Tracking
- Label: "Duration"
- Unit: "min"
- Default: "30"
- Use: Log workout time
Rating System
- Label: "Rating"
- Unit: "/10"
- Default: "5"
- Use: Rate experiences, meals, or activities
Medication Tracking
- Label: "Dosage"
- Unit: "mg"
- Default: "10"
- Use: Track medication amounts
Nutrition Tracking
- Label: "Calories"
- Unit: "cal"
- Default: "100"
- Use: Log food intake
Relationship to Custom Counters
Numeric fields are required for custom counters. When you configure a custom counter to show totals, averages, or medians, it performs calculations on the numeric values you've collected through your numeric field.
If you try to set up a custom counter without first enabling a numeric field, you'll see a warning that the numeric field is required.
Premium Feature Notice
Numeric fields are a Premium feature and require:
- Premium subscription: Feature is not available to free users
If you don't have Premium access, the Numeric Field section will not appear in the Edit Action Button window.
Tips for Effective Numeric Field Use
- Choose clear labels: Use descriptive names that make sense when you're entering data quickly
- Pick appropriate units: Short, recognizable abbreviations work best
- Set realistic defaults: Choose values you use most often to speed up data entry
- Consider data ranges: Think about the typical range of values you'll track
- Test your setup: Try clicking the button a few times to make sure the configuration feels natural